Categories
Categories
- Home
- Cake Decorating Tutorials-Recipes - Free
- Cake Decorating Instruction (1)
Cake Decorating Instruction (1)
Cake Decorating Instruction
Free Tutorials on cake decorating and how to use your cake decorating supplies.
Cake & Icing Preparation
- Baking the Cake
- Baking Times, Batter Amounts & Number of Servings
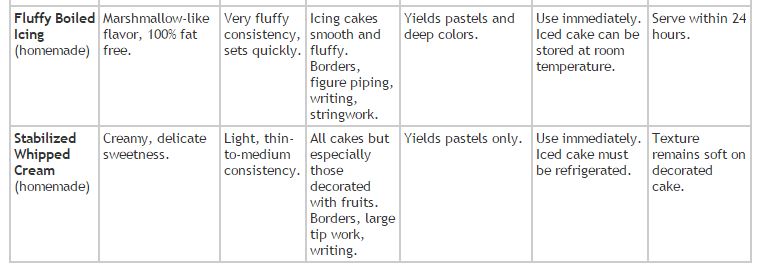
Icing Chart - What Type To Use, Storage, Etc. - Buttercream Icing Recipe (Winbeckler's) & Video
Leveling the Cake
Cake Board Preparation - Cake Board Ruffle Chart
Torting the Cake
Filling the Layers - Stacking the Layers
Achieving A Smoothly Frosted Cake
Two Methods of Icing the Cake - Cutting Charts
-
- ------------------------------------------------------------------
-
Baking the Cake
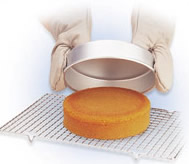
Bake your cakes with care and you´ll always start with a perfect decorating surface—that way your decorating will really shine! What is the perfect cake for decorating? Smooth, golden brown surface, very few crumbs and a nice, springy crust. Here's the easy way to get it right:
Start with a good, quality pan, properly prepared for baking.
1. Preheat oven to the temperature specified in your recipe.
2. Prepare the pan. You can either use solid vegetable shortening and flour, a commercial release spray or make your own Pan Coat. Never use butter, margarine or liquid vegetable oil–they'll make your cake stick and possibly burn the surface. Apply shortening or Cake Release inside the pan with a pastry brush or paper towels. Spread so that all indentations are covered. When using shortening, you'll need to sprinkle about 2 Tablespoons of flour inside the pan and shake so that flour covers all greased surfaces. Turn the pan upside down and tap lightly to remove excess flour. If any shiny spots remain, touch them up. If you're using Cake Release or Bake Easy™ Non-Stick Spray all you do is apply it inside the pan–no need to add flour.
3. Bake the cake. When baking in Wilton pans, use the recommended batter amounts and the specific baking instructions provided with the pan. Pour cake batter in pan, spread evenly with a spatula and tap the pan on your counter top to remove air bubbles. Bake on the middle rack of a preheated oven for the time specified in the recipe. To test whether cake is done, insert a toothpick or cake tester near center and remove. If tip is clean, cake is done. If batter is visible, bake a little longer until toothpick or tester comes out clean. When done, remove your cake from the oven and cool in the pan on a rack for 10 minutes. Run a thin knife between the cake and side of the pan.
4. Unmold the cake. Place a cooling rack against the cake and turn both cooling rack and pan over. Lift pan off carefully; cool at least one hour. Brush off any loose crumbs before icing.
More About Baking the Cake:
Baking Times, Batter Amounts & Number of Servings
One cake mix yields 4 to 5 1/2 cups of batter. Pans are usually filled 1/2 to 2/3 full; 3" deep pans should be filled only 1/2 full. Batter amounts on these charts are for pans 2/3 full of batter. For large cakes, always check for doneness after they have baked for 1 hour.
Note: For Pans 10" and larger, use a heating core when baking. Use 2 cores for 18" pans.
The charts below show baking information and serving amounts for both 2-inch pans and 3-inch high pans. The figures for 2-inch pans are based on a 2-layer or 4-inch depth cake. The figures for 3-inch pans are based on a 1-layer cake which has been torted and filled to reach a 3-inch depth.
The serving amounts listed are based on party-sized portions of approximately 1-1/2 x 2 inches or wedding-sized portions which are cut smaller, about 1 x 2 inches. Cakes from 3 to 6 in. high, baked in the same size pan, would yield the same number of servings because they follow the same pattern of cutting. Cakes shorter than 3 in. would yield half the number of servings indicated for that pan.
The number of servings given is meant as a guide only. Icing amounts are very general and will vary with consistency, thickness applied and tips used. Icing amounts allow for top and bottom borders.
Wedding Cake Baking and Serving Guide - 2 in. Deep Pans
Wedding Cake Baking and Serving Guide - 3 in. Deep Pans
Party Cake Baking and Serving Guide - 2 in. Deep Pans
Party Cake Baking and Serving Guide - 3 in. Deep Pans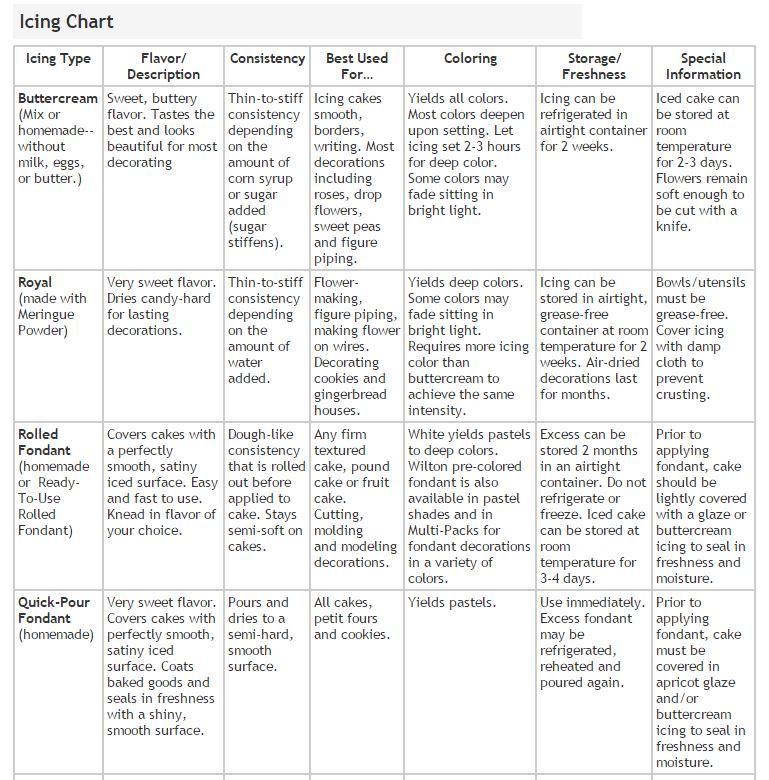
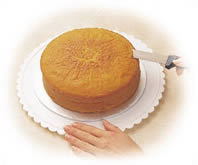
After the cake has cooled one hour, you will need to level it. This is true for all cakes, even for shaped cakes, like a bear cake. Leveling removes the crown from the cake center and gives you an even decorating surface.
Trim off the raised center portion using a serrated knife.
Place the cake on a cardboard , then place on a turntable. While slowly rotating the turntable, move the knife back and forth across the top of the cake in a sawing motion to remove the crown. Try to keep the knife level as you cut. Brush off all loose crumbs.
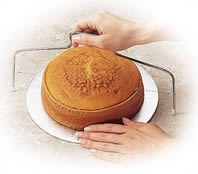
If you're using the Cake Leveler, start with your cake on a cardboard cake circle. Measure the height you want to cut from your cake, then position the ends of the cutting wire into the side notches to reach that height. Keep the legs standing level on your work surface, and cut into the cake, using an easy sliding motion.
Portions of text and images courtesy of Wilton Industries, Inc. Used with permission
![]()
 Loading... Please wait...